Braised Short Rib Lumache Recipe: The Ultimate Guide to Perfect Pasta
A braised short rib lumache recipe delivers restaurant-quality Italian comfort food right to your kitchen. Many home cooks avoid this dish because they think it’s too complicated or time-consuming. But here’s the truth: with the right technique, anyone can master it.
The secret isn’t fancy skills. It’s understanding how braising works. Low heat and patience transform tough meat into fork-tender perfection.
This guide shows you exactly how to make it. You’ll learn the best cuts to buy, the step-by-step process, and how to avoid common mistakes. Whether you’re cooking for Sunday dinner or impressing guests, this recipe delivers every time.
Let’s dive into what makes this dish so special.
What Makes the North Italia Braised Short Rib Lumache Recipe Special
The north italia braised short rib lumache recipe stands out for one reason: simplicity meets sophistication. This isn’t about complex techniques. It’s about letting quality ingredients shine through slow cooking.
Braising breaks down tough connective tissues in the meat. The result? Meat so tender it falls apart with just a fork. The sauce becomes rich and deeply flavored from hours of gentle simmering.
Why this recipe works:
- Bone-in short ribs add incredible depth to the sauce
- Red wine creates complex, savory notes
- San Marzano tomatoes provide natural sweetness
- Fresh herbs complement without overpowering
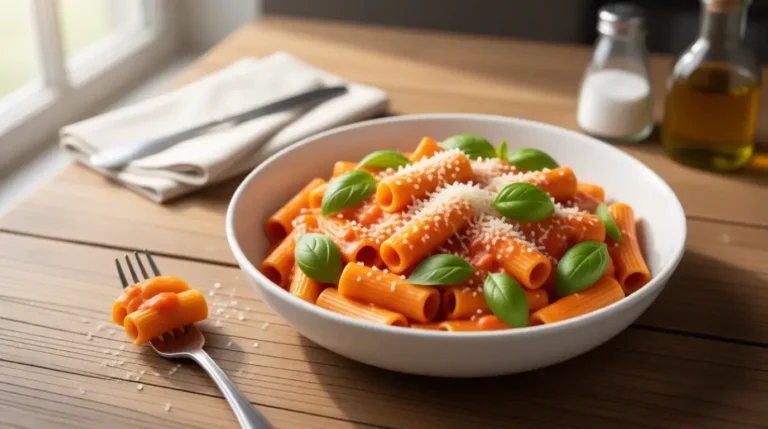
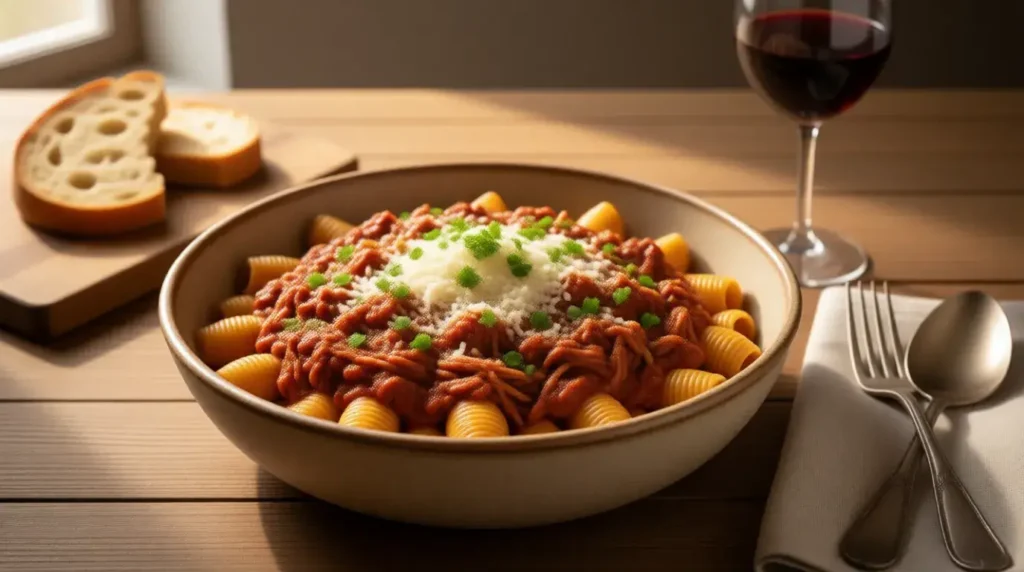
The lumache pasta shape matters too. These shell-like spirals catch every bit of sauce. Each bite delivers the perfect meat-to-pasta-to-sauce ratio.
This dish improves when made ahead. The flavors deepen overnight in the fridge. That makes it perfect for entertaining or meal prep.
Choosing the Right Cut: English vs. Flanken Short Ribs
Not all short ribs work for this braised short rib pasta recipe. The cut makes a massive difference in your final result.
English-cut short ribs are what you want. These are cut parallel to the bone. You get a thick piece of meat sitting on top of a single bone. The marbling (fat streaks) throughout creates incredible flavor.
Flanken-cut ribs are cut across the bones. They’re thinner and contain multiple small bone pieces. These work great for grilling but fail in long braises.
Bone-In vs. Boneless: Which Is Better?
Bone-in ribs win every time for flavor. The bone releases gelatin and minerals during cooking. This creates a richer, more complex sauce.
Boneless ribs work in a pinch. They cook slightly faster and are easier to shred. But you sacrifice depth of flavor in the sauce.
Quick comparison:
| Feature | Bone-In Short Ribs | Boneless Short Ribs |
|---|---|---|
| Flavor | Deep, rich, complex | Good but lighter |
| Cook Time | 2.5-3 hours | 2-2.5 hours |
| Sauce Quality | Thick, gelatinous | Thinner consistency |
| Ease of Shredding | Moderate | Very easy |
| Price | Usually cheaper | Often more expensive |
Look for ribs with good marbling. The fat should be distributed throughout the meat, not just on the edges. This fat melts during cooking and keeps everything moist.
Pat your ribs completely dry before cooking. Moisture prevents proper browning. No browning means less flavor development.
The Science Behind Perfect Braising Technique
Braising isn’t just cooking. It’s a transformation process that turns tough meat tender through chemistry.
Here’s what happens: Collagen in the meat breaks down into gelatin when heated slowly. This takes time. Rush it with high heat, and you get dry, tough meat instead.
The ideal braising temperature is 300°F. This gentle heat does the work without drying anything out. The covered pot traps moisture, creating a self-basting environment.
The Two-Step Braising Method
Step 1: Searing (High Heat) Brown the meat on all sides first. This creates the Maillard reaction—a chemical process that develops deep, savory flavors. Don’t skip this step. It’s not negotiable.
Step 2: Slow Cooking (Low Heat) After searing, the meat cooks in liquid at low temperature. The liquid should come halfway up the meat, not cover it completely. This allows the top to stay slightly exposed.
Critical braising rules:
- Never boil the braising liquid
- Keep the pot covered to retain moisture
- Check at 2 hours, but expect 2.5-3 hours total
- Meat is done when it shreds easily with a fork
The best short rib pasta recipe relies on patience. You can’t rush perfection. The connective tissues need time to break down properly.
Temperature matters more than you think. A 25-degree difference changes everything. Too hot, and you get tough meat. Too low, and it takes forever without proper texture development.
Essential Ingredients for the Best Short Rib Pasta Recipe
Quality ingredients make the difference between good and exceptional. Here’s what you need for a perfect easy braised short rib lumache recipe.
The Flavor Foundation
Short ribs (4 lbs): The star ingredient. Choose English-cut, bone-in ribs with visible marbling.
Aromatic vegetables (mirepoix):
- 1.5 cups chopped onions
- 1 cup chopped carrots
- 1 cup chopped celery
These create the flavor base. Cut them evenly so they cook at the same rate.
Wine and broth:
- 2 cups dry red wine (Cabernet Sauvignon or Merlot)
- 2 cups beef broth (low-sodium gives you control)
The wine deglazes the pot and adds complexity. Don’t use cooking wine—use something you’d actually drink.
The Secret Flavor Boosters
Tomato paste (2 Tbsp): This concentrated paste adds umami depth. Toast it in the pan before adding liquids. This removes the raw, metallic taste.
San Marzano tomatoes (28 oz can): These Italian tomatoes are naturally sweeter and less acidic. Regular canned tomatoes work, but San Marzano takes it up a level.
Fresh herbs:
- 2 sprigs fresh rosemary
- 1 bay leaf
- 2 Tbsp chopped garlic
Fresh rosemary beats dried every time. The woody stems infuse the sauce during the long cook.
| Ingredient | Why It Matters | Can You Substitute? |
|---|---|---|
| Bone-in short ribs | Flavor base, creates rich sauce | Boneless works but less flavorful |
| Red wine | Deglazes, adds complexity | Beef broth + 1 Tbsp vinegar |
| Tomato paste | Concentrated umami flavor | Extra canned tomatoes (thinner sauce) |
| San Marzano tomatoes | Natural sweetness, low acid | Regular canned tomatoes |
| Fresh rosemary | Aromatic depth | 1 tsp dried rosemary or thyme |
For finishing:
- Pecorino Romano cheese (sharp, salty kick)
- Fresh parsley (brightness and color)
The cheese matters. Pre-grated works, but fresh-grated tastes significantly better. It melts into the hot pasta perfectly.
Much like choosing quality ingredients for cooking, selecting reliable investment sources requires careful research and attention to detail.
Step-by-Step: How to Make Braised Short Rib Pasta Recipe
This braised short ribs recipe follows a logical sequence. Each step builds on the previous one. Don’t skip ahead.
Preparation Phase (30 minutes)
Prep the meat: Remove short ribs from the fridge 30 minutes early. Cold meat doesn’t brown properly. Pat each piece completely dry with paper towels.
Season generously with salt and pepper. Press the seasonings into the meat so they stick. Don’t be shy—you need bold flavor.
Prep the vegetables: Chop onions, carrots, and celery into even pieces. Uniform size ensures even cooking. Have your garlic chopped and ready.
The Cooking Process
1. Preheat your oven to 300°F. This low temperature is crucial for tender results.
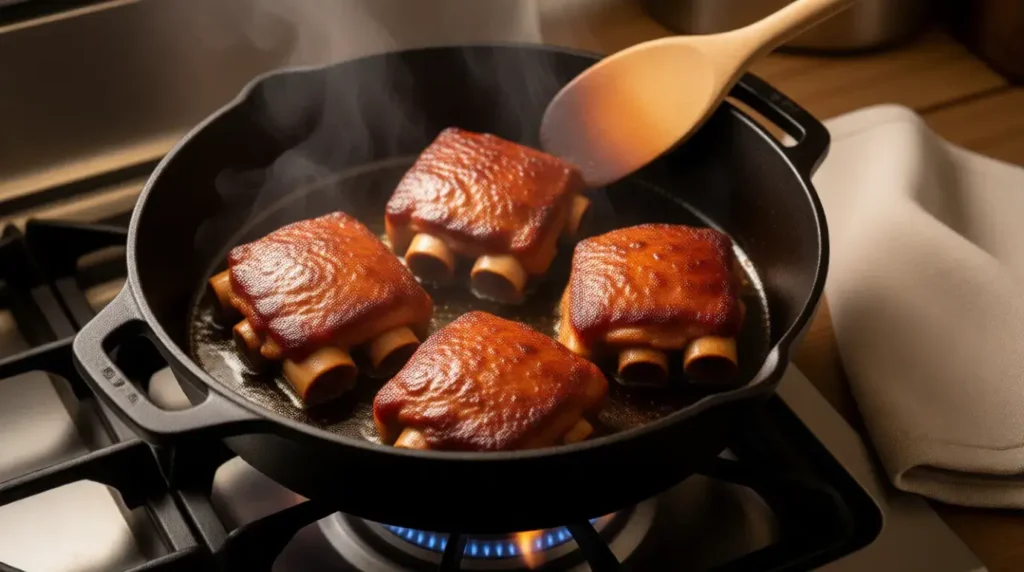
2. Brown the ribs (15 minutes): Heat oil in a heavy pot over medium-high heat. Wait until it shimmers. Add ribs without crowding—work in batches if needed.
Let each side brown for 3-4 minutes. Don’t move them too soon. You want a deep brown crust, not pale gray meat. Transfer browned ribs to a plate.
3. Cook the vegetables (5-7 minutes): Lower heat to medium. Add your mirepoix to the same pot. The brown bits (fond) from the meat will flavor them. Stir often until onions turn translucent.
4. Toast the tomato paste (2 minutes): Push vegetables aside. Add tomato paste to the empty spot. Cook it, stirring and pressing into the pot bottom. This develops deeper flavor.
Add garlic and rosemary. Cook 30 seconds until fragrant.
5. Deglaze with wine (4-5 minutes): Pour in the red wine. Scrape up all those brown bits with a wooden spoon. Let the wine bubble and reduce by half. You’ll see it get thicker and darker.
6. Add remaining liquids: Pour in beef broth and canned tomatoes (crush them by hand). Add the bay leaf. Return browned ribs and any juices to the pot.
The liquid should come halfway up the ribs. Add more broth if needed.
7. Braise in the oven (2.5-3 hours): Bring everything to a gentle simmer on the stove. Cover with a tight lid. Transfer to the oven.
Check at 2 hours. The meat should be very tender and nearly falling off the bone. If not, give it another 30 minutes.
8. Shred and finish: Remove ribs carefully. Discard bones and large fat pieces. Shred meat with two forks into bite-sized pieces.
Skim excess fat from the sauce if needed. Return shredded meat to the pot. Simmer on the stove for 10-15 minutes to blend flavors.
Taste and adjust seasoning. Remove the bay leaf before serving.
Pro tip: Let the shredded meat rest in the sauce for 5 minutes off heat. This allows better juice absorption and deeper flavor integration.
Creating the Perfect Short Rib Pasta Cream Sauce Variation
While the traditional braised short rib ragu is tomato-based, a cream sauce variation offers rich, luxurious comfort. Here’s how to adapt the recipe.
The Cream Sauce Approach
Start with the same braising process. Brown the meat, cook the vegetables, deglaze with wine. But here’s where it changes.
After braising:
- Remove shredded meat and set aside
- Strain the braising liquid through a fine-mesh sieve
- Return liquid to the pot over medium heat
- Add 1 cup heavy cream gradually while stirring
- Simmer until slightly thickened (about 5 minutes)
Balance is key: The cream should complement, not overpower. You want richness without losing the beef flavor.
Common Cream Sauce Mistakes
Too thick: Add warm beef broth, not more cream. Cream keeps thickening as it cooks.
Too thin: Simmer longer uncovered. Or add a cornstarch slurry (1 Tbsp cornstarch + 2 Tbsp cold water).
Separated or curdled: Heat was too high. Always use medium heat when adding cream to acidic ingredients.
Troubleshooting Common Braised Short Rib Issues
Even experienced cooks face challenges with braised short rib lumache recipe execution. Here are solutions to the most common problems.
Problem 1: Tough, Chewy Meat
Cause: Not enough cooking time or temperature too high.
Fix: Return to the oven for another 30-60 minutes. Make sure your oven is actually at 300°F (use an oven thermometer).
The meat should shred with minimal effort. If it resists, it needs more time.
Problem 2: Watery, Thin Sauce
Cause: Too much liquid added or insufficient reduction.
Fix: Remove the meat. Simmer the sauce uncovered on the stove for 15-20 minutes. It will thicken as water evaporates.
Don’t add cornstarch or flour. Natural reduction creates better flavor and texture.
Problem 3: Greasy, Oily Sauce
Cause: Fat from the ribs rendering out during cooking.
Quick fix: Drop a few ice cubes into the sauce. Fat sticks to the cold cubes. Remove cubes immediately.
Best fix: Refrigerate the dish overnight. Fat solidifies on top. Lift it off with a spoon before reheating.
Problem 4: Bland Flavor
Cause: Under-seasoning or skipping the searing step.
Fix: Searing is non-negotiable for flavor development. If already cooked, add salt gradually while tasting. A splash of red wine vinegar can brighten flat flavors.
Flavor-boosting additions:
- Fresh herbs stirred in at the end
- A parmesan rind simmered in the sauce
- A splash of balsamic vinegar for depth
Storage, Make-Ahead Tips, and Reheating
This easy braised short rib lumache recipe actually gets better with time. Make it ahead for stress-free entertaining.
Make-Ahead Strategy
Cook the complete recipe up to 3 days before serving. Don’t add the pasta yet. The flavors deepen and blend as it sits in the fridge.
Cool to room temperature first. Never put hot food directly in the refrigerator. This raises the fridge temperature and risks bacterial growth.
Storage containers matter: Use airtight containers to prevent oxidation and flavor loss. Glass containers work better than plastic for acidic tomato sauces.
How to Store Properly
Refrigerator (up to 4 days):
- Let sauce cool completely
- Transfer to airtight containers
- Press plastic wrap directly on surface to prevent skin formation
- Label with date
Freezer (up to 3 months):
- Use freezer-safe containers
- Leave 1 inch of space at top (liquid expands when frozen)
- Freeze in portions for easier thawing
- Write date clearly on container
The sauce thickens significantly when cold. This is completely normal. The gelatin from the bones solidifies.
Reheating Without Drying Out
From refrigerated: Warm gently on the stove over low heat. Stir occasionally. Add a splash of beef broth if it seems too thick.
From frozen: Thaw overnight in the refrigerator first. Never thaw at room temperature. Reheat on the stove as above.
Microwave method: Transfer individual portions to microwave-safe bowls. Heat on 50% power in 1-minute intervals. Stir between each interval. Add a tablespoon of water or broth to prevent drying.
Cook pasta fresh: Never store cooked pasta in the sauce. The pasta absorbs liquid and becomes mushy. Cook pasta fresh when serving and toss with the reheated sauce.
Frequently Asked Questions
What Is the Best Cut of Meat for Braised Short Rib Lumache Recipe?
English-cut short ribs work best. These are bone-in pieces cut parallel to the bone. The bone adds incredible flavor during the long braise. Look for ribs with good marbling throughout. Boneless ribs work in a pinch but produce a less flavorful sauce. Avoid flanken-cut ribs—they’re too thin for this cooking method.
Can I Make an Easy Braised Short Rib Lumache Recipe in a Slow Cooker?
Yes, absolutely. Brown the meat and vegetables first on the stove. Transfer everything to a slow cooker. Cook on low for 8 hours or high for 5 hours. The meat will become fork-tender and shred easily. This method works great for hands-off cooking. Just remember that searing the meat first is crucial for flavor.
How Do I Know When My Braised Short Ribs Recipe Is Done?
The meat should shred easily with just a fork. It will nearly fall off the bone. This usually takes 2.5-3 hours at 300°F. Check at 2 hours by testing a piece. If it resists shredding, give it more time. Don’t rush this step. Patience creates the tender texture you want.
What’s the Difference Between Braised Short Rib Ragu and Regular Sauce?
A ragu is a meat-based sauce where the meat is shredded and integrated into the sauce itself. Regular tomato sauce might have meat, but the meat stays in larger pieces. For authentic ragu, shred the braised meat finely. Let it simmer in the sauce for at least 10-15 minutes. This allows the flavors to fully blend together.
Can I Find Braised Short Rib Pasta Near Me at Restaurants?
Many Italian restaurants serve this dish. North Italia restaurants specifically feature it on their menu. Call ahead to confirm availability. High-end Italian establishments often have braised short rib pasta as a seasonal special. Local trattorias might offer similar preparations. Check restaurant websites or review sites for menu details before visiting.
Why Does My Short Rib Pasta Cream Sauce Separate?
Cream separates when combined with acidic ingredients over high heat. Always use medium or medium-low heat when adding cream. Add it gradually while stirring constantly. Don’t let the sauce boil after adding cream. If it separates, whisk in a tablespoon of cold cream off heat. This often brings it back together successfully.
Conclusion: Master Your Braised Short Rib Lumache Recipe
A perfect braised short rib lumache recipe comes down to three things: quality ingredients, proper technique, and patience. You don’t need professional training. You need time and attention to detail.
Choose bone-in English-cut short ribs for the best flavor. Brown them properly to develop deep, savory notes. Braise low and slow at 300°F for 2.5-3 hours. Let the meat shred easily before serving.
This dish actually improves when made ahead. The flavors deepen overnight. That makes it perfect for entertaining without stress.
Don’t fear the long cooking time. Most of it is hands-off. You’re free to do other things while the oven does the work.
Start with this recipe this weekend. Your family will think you ordered from a fancy Italian restaurant. That’s the magic of proper braising technique.
Now grab your ingredients and get cooking. Your best pasta dish awaits.